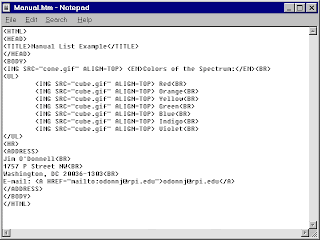
HTML text documents are actually quite simple to create. To create an HTML document, you open a text-editing program and then type in the HTML code. After you have entered the HTML statements, you save your document as a text file with an .htm or .html extension. For example, start your favorite text editor (such as Windows Notepad) now, and enter the following really cool HTML code:
HELLO WORLD! Here I am.
Now, save your work to a Web page file (that is, a file with an .htm or .html extension) on your hard drive. Then, save the code you entered for this example as TestPage.htm in the folder you create. To take your first Web page for a test drive, start your Web browser, and type File:// followed by the drive letter and pathname of your Web page into the browser's Address field. For example, if you saved the Web page in this example as TestPage.htm in the C:\HTML folder, type File://c:/HTML/TestPage.htm into the browser's Address field. Then, press ENTER. Your Web browser, in turn, will display a Web page. That is all there is to it! You are now officially a Web page author. That is pretty cool, right?
In standard word processing, a paragraph defines a group of sentences. Typically, a blank line or an indented first word identifies the start of a new paragraph. When you insert text into a Web page, the tag controls the end of text and the subsequent beginning of the next paragraph. The
tag instructs the Web browser to move down one line, insert a blank line, and then to begin the next paragraph on the line below the blank line for the text following the tag. In this following code, the start and end paragraph tags () mark the beginning and end of each paragraph.
The text between the two paragraph tags defines a single paragraph. Paragraphs contain one or more sentences.
HTML also has several text formatting tags you can use to change the appearance of text, usually for emphasis. To apply a formatting style, place the format's start tag at the beginning of the text you want to style. The following list describes three of the most common formatting tags.
- Text placed between the Bold tags is displayed in bold font.
- Text placed between the Italic tags is displayed in italic font.
- Text placed between the Underline tags is displayed with an underline.
The following really cool HTML code displays text in the bold, italic, and underlined style.
This text displays bold
This text displays in italic
This text displays underlined
By the way, the Web browser ignores any spaces you place on either side of the equal sign (=) between an attribute and the attribute's quoted value. As such, you will see some Web documents with no spaces (as shown by the HTML statement in the preceding example) and some documents with spaces on either one or both sides of the equal (=) sign. When writing your HTML tags, select whichever looks best to you; just be consistent.
When you want to assign the same set of attributes to several adjacent Web page elements at once, enclose the elements you want to affect with start and end division tags (). Say, for example, that you want to center two lines of text and a graphic image between the left and right margins on the Web page. Rather than add the align attribute to each of the three HTML tags, place a tag before the first element and a tag after the end of the last element, as shown in the following code:
This text is centered BELOW the picture.
This is some really cool HTML code for you to get a good picture of this web language.It's very interesting that you can use HTML in more platforms, and you can use it even when you design your own iPhone applications, or when you just create your own Web page. Take a look at the coolest free Apple apps, and combined with the information here, maybe you will create some cool iPhone applications.

.jpg)

.gif)

No comments:
Post a Comment